Hey guys, this part of SOLARIS was a very difficult concept for me to digest initially, however slowly I mastered it. I would suggest everybody going through this concept to read each and everything very carefully.
Few concepts might be repeated from previous posts, however it worth reviewing them.
A file system refers to each of the following:
- A particular type of file system : disk based, network based or virtual file system
- An entire file tree, beginning with the / directory
- The data structure of a disk slice or other media storage device
- A portion of a file tree structure that is attached to a mount point on the main file tree so that files are accessible.
Solaris uses VFS(Virtual File system) architecture which provides a standard interface for different file system types and enables basic operations such as reading, writing and listing files.
UFS(Unix File System) is the default file system for Solaris. It starts with the root directory. Solaris OS also includes ZFS(Zeta File System) which can be used with UFS or as primary file system.
Important In-memory directories:
Primary sub directories under /dev directory:
Primary Sub directories under /etc directory:
Primary Sub directories under /usr directory:
Primary Sub directories under /var directory:
Note: In-memory directories are created & maintained by Kernel & system services. A user should never create or alter these directories.

A disk device has physical and logical components.
Physical component: disk platters, read write head.
Logical component: disk slices, cylinders, tracks, sectors
Data Organization on the Disk Platters:
A disk platter is divided into sectors, tracks, cylinders.

Disk slices are the group of cylinders that are commonly used to organize the data by function. A starting cylinder and ending cylinder defines each slice and determine the size of the slice.
To label a disk means writing the slice information on the disk. The disk is labeled after the changes has been made to the slice.
The SPARC VTOC also known as SMI disk label occupy the first sector of the disk. It includes partition table in which you can define upto eight(0-7) disk partitions(slices)

The EFI (Extensible Firmware Interface) disk label includes a partition table in which you can define upto 10 (0 – 9) disk partitions (slices). Provision is made upto 16 slices but only 10 of these are used ( 8, plus 2 used for platform specific purposes). The Solaris OS currently do not boot from the disk containing EFI labels.
Slices 0-7 are used same as the slices in SPARC systems.
Slices 8 and 9 are used for purpose specific to x84/x64 hadware
By default the slice 8 is the boot slice and contains :
GRUB stage1 program in sector0.
The Solaris disk partition VTOC in sectors 1 & 2.
The GRUB stage2 program beginning at sector 50
Slice 9 by the convention of IDE & SATA is tagged as alternate slice. It occupies 2nd & 3rd Cylinders(Cylinder 1 & 2) of Solaris fdisk partition.
Naming conventions for Disks:
The Solaris disk name contains following components :
Controller Number(cn): Identifies the HBA (Host Bus Adapter) which controls communication between system and disk unit.
Target Number(tn): It identifies a unique hardware address assigned to SCSI target controller of a disk, tape, or CD-ROM.
Fibre channel attached disks may use World Wide Name(WWN) instead of target number.
It is assigned in sequential manner as t0, t1, t2, t3.....
Disk Number(dn): It is also known as LUN (logical Unit Number). It varies from d0 if more than one disk is attached.
Slice Number(sn): It ranges 0-7 in SPARC systems and 0-9 in x86/x64 systems.
IDE & SATA disks do not use target controllers.
Ultra 10 systems uses a target (tn) to represent the identity of disks on primary and secondary IDE buses.
t0 Master Device on primary IDE Bus
t1 Slave Devie on primary IDE BUS
t2 Master Device on seconday IDE BUS
t3 Slave Device on seconday IDE BUS
In Solaris OS each devices are represented by three different names: Physical, logical and Instance name.
Logical Device Name:
It is symbolic link to the physical device name.
It is kept under /dev directory
Every disk devices has entry in /dev/dsk & /dev/rdsk
It contains controller number, target number(if req.), disk number and slice number
Physical Device Name:
It uniquely defines the physical location of the hardware devices on the system and are maintained in /devices directory.
It contains the hardware information represented as a series of node names(separated by slashes) that indicate path through the system's physical device tree to device.
Instance Names:
It is the abbreviated name assigned by kernel for each device on system. It is shortened name for physical device name :
sdn: SCSI Disk
cmdkn: Common Disk Driver is disk name for SATA Disks
dadn: Direct Access Device is the name for the first IDE Disk device
atan: Advanced Technology Attachment is the disk name for the first IDE Disk device
The instance names are recorded in file /etc/path_to_inst.
Few commands viewing/managing devices:
prtconf command:
It displays system configuration information, including total memory. It list all possible instances of a device. To list instance name of devices attached with the system:
prtconf | grep -v not
format utility:
It displays the physical and logical device names of all the disks.
prtdiag command:
It displays system configuration and diagnostic information.
Performing device reconfiguration:
If a new device is added to the system and in order to recognize that device reconfiguration need to be done. This can be done in two ways:
First way:
1. Create a /reconfigure file.
2. Shut down the system using init 5 command.
3. Install the peripheral device.
4. Power on & boot the system.
5. Use format and prtconf command to verify the peripheral device.
Second Way:
Go to OBP and give the command:
ok>boot -r
and reboot the system.
devfsadm:
It performs the device reconfiguration process & updates the /etc/path_to_inst file and the /dev & /devices directories. This command does not require system re-boot, hence its convenient to use.
To restrict the devfsadm to specific device use the following command:
#devfsadm -c device_class
Examples:
#devfsadm
#devfsadm -c disk
#devfsadm -c disk -c tape
To remove the symbolic link and device files for devices that are no longer attached to the system use following command:
#devfsadm -C
It is also said to run in Cleanup mode. Prompts devfsadm to invoke cleanup routines that are not normally invoked to remove dangling logical links. If -c is also used, devfsadm only cleans up for the listed devices' classes.
The format utility enables to modify two types of partition on disk:
1. fdisk partition tables
2. Solaris OS partition tables (SPARC VTOC and x86/x64 VTOC)
The fdisk partition tables defines up to four partition on disk, however only one Solaris OS fdisk partition can exist on a disk. Only x86/x4 systems use fdisk partition tables.
We can use fdisk menu in the format utility to view & modify fdisk partition tables.
Solaris OS Partition Tables or Slices:
The SPARC VTOC & x86/x64 VTOC defines the slices that the Solaris OS uses on a disk.
We can use the partition menu from the format utility to view & modify these partition tables.
The SPARC system read VTOC from the first sector of the disk (Sector 0).
The x86/x64 systems read the VTOC from the second sector(sector 1) of the Solaris fdisk partition.
Few Terminologies:
Defining a Slice on SPARC systems:
1. Run the format utility and select a disk: Type format and select a disk.
2. Display the partition menu: Type partition at the format prompt.
3. Print the partition table: Type print at the partition prompt to display the VTOC
4. Select a slice: Select a slice by entering the slice number.
5. Set tag & flag values:
When prompted for ID tag, type question mark(?) and press enter to lsit tha available choices. Enter the tag name and press return.
When prompted for perission flags, type a question mark(?) and press enter to llist the available choices.
wm = write & mountable
wu = write & un-mountable
rm = read-only & mountable
ru = read-only & unmountable
The default flag is wm, press return to accept it.
6. Set the partition size: Enter the starting cylinder and size of the partition.
7. label the disk: label the disk by typing label at partition prompt.
8 Enter q or quit to exit out partition or format utility.
Creating fdisk partition using format utility(Only for x86/64 systems):
1.run the format utility and select a disk: Type format and select a disk.
2. Enter the fdisk command at format menu: If there is no fdisk partition defined, the fdisk presents the option to create a single fdisk partition that uses the entire disk.
type n to edit the fdisk partition table.
3. To create a fdisk partition select option 1.
4.Enter the number that selects the type of partition. Select option 1 to create SOLARIS2 fdisk partition.
5.Enter the percentage of the disk which you want to use.
6.fdisk menu then prompts if this should be active fdisk partition. Only the fdisk partition that is being used to boot the system be marked as active fdisk partition. Because this is going to be non-bootable, enter no.
Defining a Slice on x86/64 systems:
1. run the format utility and select a disk: Type format and select a disk.
2. Display the partiition menu: Type partition at the format prompt.
3. Print the partition table: Type print at the partition prompt to display the VTOC
4. Select a slice: Select a slice by entering the slice number.
5. Set tag & flag values:
When prompted for ID tag, type question mark(?) and press enter to lsit tha available choices. Enter the tag name and press return.
When prompted for perission flags, type a question mark(?) and press enter to list the available choices.
wm = write & mountable
wu = write & un-mountable
rm = read-only & mountable
ru = read-only & unmountable
The default flag is wm, press return to accept it.
6. Set the partition size: Enter the starting cylinder and size of the partition.
7. label the disk: label the disk by typing label at partition prompt.
8 Enter q or quit to exit out partition or format utility.
Note: For removing a slice, the steps are same as creating the slice. The only difference is at the point where specify the size of partition as 0MB.
Viewing the disk VTOC:
There are two methods to view a SPARC or x86/x64 VTOC on a disk:
1. Use the verify command in the format utility:
#format
#format> verify
2. Run prtvtoc command from the command line
#prtvtoc /dev/rdsk/c0t0d0s3
The VTOC on SPARC systems is the first sector on the disk
The VTOC on X86/x64 systems is in the second sector of the Solaris fdisk parition on the disk.
Replacing VTOC on a disk:
1. Save the VTOC information to a file as follows:
# prtvtoc /dev/rdsk/cotodos2 > /var/tmp/cotodos2.vtoc
2. Restore the VTOC using fmthard command:
#fmthard -s /var/tmp/cotodos2.vtoc /dev/rdsk/cotodos2
If we want to replace the current VTOC with the previously saved VTOC :
1. Run the format utility, select a disk, label it with default partition table or define slices & label the disk
2. use fmthard command as follows:
#fmthard -s /dev/null /dev/rdsk/c0t0d0s1
Viewing & replacing fdisk Partition table(Only for x86/x64 systems):
To view fdisk partition table:
#fdisk -W - /dev/rdsk/c1d0p0
To save fdisk partition table information to a file:
#fdisk -W /var/tmp/c1dopo.fdisk /dev/rdsk/c1dop0
To replace the fdisk partition table :
#fdisk -F /var/tmp/c1dopo.fdisk /dev/rdsk/c1dop0
Raw Device:The device which is not formatted and not mounted is called Raw Device. It is same as the unformatted drive in windows. Its information is stored in /dev/rdsk/SliceName(c0t0d0s3)
Block Device: The device which is formatted and mounted is called Block Device.
Working with Raw device: In the previous section we saw how to create a slice or partition. In order to use that partition, it need to be formatted using newfs and mounted on a mount point. Going forward we are going to discuss these concepts .
1. Formatting the raw device using “newfs” command:
The newfs command should always be applied to raw device. It formats the file system and also creates new lost+found directory for storing the unsaved data information.
Lets consider we have a raw device c0t0d0s3, which we want to mount.
#newfs /dev/rdsk/c0t0d0s3
To verify the created file system following command is used:
# fsck /dev/rdsk/<deviceName>
Once the file system is created, mount the file system.
2. Mounting the device:
It is the process of attaching the file system to the directory under root. The main reason we are going for mounting is to make the file system available to the user for storing the data. If we don’t mount the file system it cannot be accessed. It is always used for block devices.
Lets consider we want to mount raw device /dev/rdsk/c0t0d0s3 on the file system /oracle. Following step shows how to mount:
#newfs /dev/rdsk/c0t0d0s3
#mkdir /oracle
#mount /dev/dsk/c0t0d0s3 /oracle
Note: This is temporary and the file system /oracle is un-mounted upon the end of the session. To make it permanent, we need to update information to /etc/vfstab.
The “vfstab” is also called Virtual File System Table:
The /etc/vfstab(Virtual File system table) lists all the file systems to be mounted during system boot time with exception of the /etc/mnttab & /var/run. The vfstable contains following seven fields:
1. device to mount: This is the block device that needs to be mounted. E.g: /dev/dsk/c0t0d0s3
2. device to fsck: This is the raw device that needs to be mounted. E.g: /dev/rdsk/c0t0d0s3
3. mount point: The file system on which the block device need to be mounted. E.g: /oracle
4. FS type: ufs by default
5. fsck pass:
1- for serial fsck scanning and
2- for parallel scanning of the device during boot process.
6. mount at boot: 'yes' to auto-mount the device on system boot
7. mount options: There are two mount options
'-' for large files: This is default option for solaris 7,8,9,10. The files will have by default 'rw' permission and they can be more the 2gb in size.
'ro' for no large files : This option was default option in SOLARIS versions earlier than 7. The default permission for the files created is 'ro'. The files cannot be more than 2gb in size.

/etc/mnttab:
It is an mntfs file system that provides read-only information directly from kernel about the mounted file system on local host. The mount command creates entry in this file. The fields in /etc/mnttab are as follows:
Device Name: This is the block device where the file system is mounted.
Mount Point: The mount point or directory name where the file system is attached.
File System Type: The type of file system e.g UFS.
Mount options(includes a dev=number): The list of mount option.
Time & date mounted: The time at which the file system was mounted.
Whenever a file is mounted an entry is created in this table and whenever a file is removed an entry is removed from the table. When the mount command is used without any argument, it lists all the mounted file system under /etc/mnttab.
Hiding a file system:
It is a process of mounting the file system without updating the information under /etc/mnttab. The Command to do so is :
#mount -m <Block Device> <Mount Point>
e.g.#mount -m /dev/dsk/c0t0d0s3 /oracle
If we do not update /etc/mnttab file, the df -h will not be able to show the file.
Un-mounting the file system:
It is a process of detaching the file system from the directory under root. If the file system is unmounted, we cannot access the data from it. The main reason to unmount the file system is for deleting a slice and troubleshooting activities.
unmount <File System Name>
unmount -f <File System Name> (forcibly unmounting the file system)
Steps for Unmounting a normal file system:1. #unmount <File System Name>
2. Remove entry for the file system from /etc/vfstab
Steps for Unmounting a busy file system:
1. Check all the open process Ids running in file system. To do so following is the command:
#fuser -cu <FileSystemName>
It displays all the open Process Ids running on the file system.
2. Kill all the open process. To do so the command is:
#fuser -ck <FileSystemName>
3. Unmount the file system:
#unmount <FileSystemName>
4. Remove entry for the file system from /etc/vfstab
How to mount the file system with 'no large file' option?
1. Use mount command with appropriate parameters:
#mount -o ro, nolargefiles <Block Device> <FileSystemName>
2. Edit /etc/vfstab with given parameters
<Block Device Name> | <RawDeviceName> | <FileSystemName> | <FileSystemType(UFS)> |<FSCK Pass>| <Mount at boot> | <Mount Option>
How to converting “no large files” to “large files”?
1. mount -o remount, rw, largefiles <Block Device> <File System Name>
2. vi /etc/vfstab. Change the mount option for the device from 'ro' to '-'
newfs(Explore more!!!):
When we are creating a file system using newfs command on a raw device, it creates lots of data structure such as logical block size, fragmentation size, minimum disk free space.
1. Logical Block Size:
- SOLARIS supports logical block size in between 4096b to 8192b.
- It is recommended to create UFS file system with more logical block size because more block size will store more data.
- Customizing the block size:
#newfs -b 8192 <raw device>
2. Fragmentation Size
- The main purpose of it is to increase the performance of the hard disk by organizing the data continuously and which helps in providing fast read/write requests.
- The default fragmentation size is 1kb.
- By default fragmentation is enabled in SOLARIS OS.
3. Minimum Disk Free Space
- It is the % of free space reserved for lost+found directory for storing the unsaved data information.
- The default minimum disk free space before SOLARIS 7 is 8%, whereas from SOLARIS 7 onwards it is auto defined between 6% to 10%.
- Customizing the minimum disk free space:
#newfs -m <Value B/W 6-10%> <raw Device>
Tuning File System:
It is process of increasing the minimum disk free space without loosing the existing data and disturbing the users (unmounting the file system). Following command is used to tune file system?
#tunefs -m 10 <raw device>
Managing File System Inconsistencies and Disk Space:
What is File Inconsistencies? What are the reason for File Inconsistencies?
The information about the files are stored in inodes and data are stored in blocks. To keep track of the inodes and available blocks UFS maintains set of tables. Inconsistency will arise if these tables are not properly synchronized with the data on disks. This situation is File Inconsistencies.
Following can be one of the possible reason for the File Inconsistencies:
1. Improper shutdown of the system or abrupt power down.
2. Defective disks.
3. A software error in the kernel.
How to fix disk Inconsistencies in Solaris 10?
In Solaris we have fsck utility to fix the disk or file system inconsistencies. We will discuss now in detail, how to use the fsck utility to manage the disks/file system.
Identifying issues on file systems using fsck:
Type fsck -m /dev/rdsk/c0t0d0s7 and press Enter. The state flag in the superblock of the file system specified is checked to see whether the file system is clean or requires checking. If we omit the device argument, all the UFS file systems listed in /etc/vfstab with an fsck pass value of greater than 0 are checked.
In the following example, the first file system needs checking, but the second file system does not:
#fsck -m /dev/rdsk/c0t0d0s7
** /dev/rdsk/c0t0d0s7
ufs fsck: sanity check: /dev/rdsk/c0t0d0s7 needs checking
#fsck -m /dev/rdsk/c0t0d0s8
** /dev/rdsk/c0t0d0s8
ufs fsck: sanity check: /dev/rdsk/c0t0d0s8 okay
The syntax for the fsck command is as follows:
#fsck [<options>] [<rawDevice>]
The <rawDevice> is the device interface in /dev/rdsk. If no <rawDevice> is specified,fsck checks the /etc/vfstab file. The file systems are checked which are represented by the entries in the /etc/vfstab with :
1. The value of the fsckdev field is a character-special device.
2. The value of the fsckpass field is a non-zero numeral.
The options for the fsck command are as follows:
-F <FSType>. Limit the check to the file systems specified by <FSType>.
-m. Check but do not repair—useful for checking whether the file system is suitable for mounting.
-n | -N. Assume a "no" response to all questions that will be asked during the fsck run.
-y | - Y. Assume a "yes" response to all questions that will be asked during the fsck run.
Steps to run fsck command :
1. Become superuser.
2. Unmount the file system that need to check for the file system inconsistency.
3. Use the fsck command by specifying the mount point directory or the/dev/dsk/<deviceName> as an argument to the command.
4. The inconsistency messages will be displayed.
5. fsck command will not necessarily fix all the error. You may have to run twice or thrice until you see following message:
"FILE SYSTEM STATE NOT SET TO OKAY or FILE SYSTEM MODIFIED"
6. Mount the repaired file system.
7. Move the files and directories of lost+found directories to their corresponding location. If you are unable to locate the files/directories in lost+found directories, remove the files/directories.
Repairing files if boot fails on a SPARC system:
1. Insert the Solaris DVD
2. Execute a single user boot from DVD
ok boot cdrom -s
3. use fsck command on faulty / (root) partition to check and repair any potential problems in the file system and make the device writable.
#fsck /dev/rdsk/c0t0d0s0
4. If the fsck command is success, mount the /(root) file system on the /a directory.
#mount /dev/dsk/c0t0d0s0 /a
5. Set and export the TERM variable, which enables vi editor to work properly.
#TERM=vt100
#export TERM
6. Edit /etc/vfstab file & correct any problems.
#vi /a/etc/vfstab
:wq!
7.Unmount the file system.
#cd /
#unmount /a
8. Reboot the system
#init 6
Solaris Disk Architecture Summary:
1. VTOC (Volume Table of Content) [0-sector]:
It contains information about the disk geometry and hard drive information. The default location is in '0' sector. The command to display VTOC is as follows:
#prtvtoc <Device/Slice Name>
2. Boot Sector [sector 1-15]:
It contain boot traps program information.
3. Super Block [sector 16-31]:
It contains following information:
1. Hardware manufacturer
2. Cylinders
3. Inodes
4. Data Block
4. Backup Super Block:
Super block maintains identical copy of its data in Backup Super Block. If Super Block is corrupted we can recover it using backup server super block number.
The command to display the backup super block number of a slice is:
newfs -N <SliceName>
5. Data Block:
It contains complete information about the data. Each block is divided into 8KBs. For every 8KB there are addresses called block address for kernel reference
6. Inode Block:
Inode block contains information about all inodes.
Note: Backup Super bock, data block, inode block are available in any part of the hard drive starting from 32 sectors of hard drive.
Swap Management:
The anonymous memory pages used by process are placed in swap area but unchanged file system pages are not placed in swap area. In the primary Solaris 10 OS, the default location for the primary swap is slice 1 of the boot disk, which, by default, starts at cylinder 0.
Swap files:
It is used to provide additional swap space. This is useful when re-slicing of disk is difficult. Swap files reside on files system and are created using mkfile command.
swapfs file system:
The swapfs file system consists of Swap Slice, Swap files & physical memory(RAM).
Paging:
The transfer of selected memory pages between RAM & swap areas is termed as paging. The default page size in Solaris 10 SPARC machine is 8192bytes and in X86 machine is 4096bytes.
Command to display size of a memory page in bytes:
# pagesize
Command to display all supported page sizes:
# pagesize -a
Swapping is the movement of all modified data memory pages associated with a process, between RAM and a disk. The available swap space must satisfy two criteria:
1. Swap space must be sufficient to supplement physical RAM to meet the needs of concurrently running processes.
2. Swap space must be sufficient to hold crash dump(in a single slice), unless dumpadm(1m) has been used to specify a dump device outside of swap space.
Configuring Swap space:
The swap are changes made at command line is not permanent and are lost after a reboot. To permanently add swap space, create an entry in the /etc/vfstab file. The entry in /etc/vfstab file is added to swap space at each reboot.
Displaying the current swap configuration:
#swap -s
The swap -s output does not take into account the preallocated swap space that has not yet been used by a process. It displays the output in Kbytes.
Displaying the details of the system's physical swap areas:
#swap -l
It reports the values in 512byte blocks.
Adding a swap space:
Method 1: Creating a swap slice.
1. #swap -a /dev/dsk/c1t1d0s1
2. Edit the /etc/vfstab file and add following entry to it:
/dev/dsk/c1t1d0s1 - - swap - no -
Note: When the system is rebooted the new swap slice is automatically included as the part of the swap space. If an entry is not made in the /etc/vfstab file the changes made in swap configuration is lost after the reboot.
Method2: Adding swap files.
1. Create a directory to hold the swap files:
#mkdir -p /usr/local/swap
2. Create swap file using mkfile command:
#mkfile 20m /usr/local/swap/swapfile
3. Add the swap file to the system's swap space:
#swap -a /usr/local/swap/swapfile
4. Add following entry for the swap file to the /etc/vfstab file:
/usr/local/swap/swapfile - - swap - no -
Removing a swap space:
Method1: Removing the swap slice
1. Remove the swap slice:
#swap -d /dev/dsk/c1t1d0s1
2. Delete the following entry from /etc/vfstab file:
/dev/dsk/c1t1d0s1 - - swap - no -
Method2: Removing swap files.
1. Delete the swap file from current configuration:
#swap -d /usr/local/swap/swapfile
2. Remove the swap file to free the disk space:
#rm /usr/local/swap/swapfile
3. Remove following entry for the swap file to the /etc/vfstab file:
/usr/local/swap/swapfile - - swap - no -
Few concepts might be repeated from previous posts, however it worth reviewing them.
File System
A file system is a structure of directories that you can use to organize and store files.A file system refers to each of the following:
- A particular type of file system : disk based, network based or virtual file system
- An entire file tree, beginning with the / directory
- The data structure of a disk slice or other media storage device
- A portion of a file tree structure that is attached to a mount point on the main file tree so that files are accessible.
Solaris uses VFS(Virtual File system) architecture which provides a standard interface for different file system types and enables basic operations such as reading, writing and listing files.
UFS(Unix File System) is the default file system for Solaris. It starts with the root directory. Solaris OS also includes ZFS(Zeta File System) which can be used with UFS or as primary file system.
Important system directories
| / | The root of overall file system namespace |
| /bin | Symbolic link to /usr/bin & location for binary files of standard system commands |
| /dev | The primary directory for logical drive names |
| /etc | Host specific configuration files and databases for system administration |
| /export | the default directory for commonly shared file system such as user's home directory, application software or other shared file system |
| /home | the default mount point for the user's hoe directory |
| /kernel | The directory of platform independent loadable kernel modules |
| /lib | It contains shared exe and SMF exe |
| /mnt | temporary mount point for file systems |
| /opt | Default directory for add-on application packages |
| /platform | /platform The directory of platform dependent loadable kernel modules |
| /sbin | The single user bin directory that contains essential exe that are used during booting process and in manual system-failure recovery |
| /usr | The directory that contains program, scripts & libraries that are used by all system users |
| /var | It includes temporary logging and log files |
Important In-memory directories:
| /dev/fd | It contains special files related to current file descriptors in use by system |
| /devices | Primary directory for physical device name |
| /etc/mnttab | memory-based file that contains details of the current file system mounts |
| /etc/svc/volatile | It contains log files & references related to current state of system system services |
| /proc | Stores current process related information. Every process has its set of sub directories below /proc directory |
| /tmp | It contains temporary files and is cleared upon system boot |
| /var/run | It contains lock files, special files & reference file for a variety of system processes & services. |
Primary sub directories under /dev directory:
| /dev/dsk | Block disk devices |
| /dev/fd | File descriptors |
| /dev/md | Logical volume-management meta disk devices |
| /dev/pts | Pseudo terminal devices |
| /dev/rdsk | Raw disk devices |
| /dev/rmt | Raw magnetic tape devices |
| /dev/term | serial devices |
Primary Sub directories under /etc directory:
| /etc/acct | Configuration information for the accounting system |
| /etc/cron.d | Configuration information for the cron utility |
| /etc/default | Default information for various programs |
| /etc/inet | Configuration files for network services |
| /etc/init.d | Script for starting and stopping services |
| /etc/lib | dlls needed when /usr file system is not available |
| /etc/lp | Configuration information about printer subsystem |
| /etc/mail | Configuration information about mail subsystem |
| /etc/nfs | configuration information for NFS server logging |
| /etc/opt | Configuration information for optional packages |
| /etc/rc.d# | Legacy script which is executed while entering or leaving a specific run level |
| /etc/security | Control files for role based access and security privileges |
| /etc/skel | Default shell initialization file for new user accounts |
| /etc/svc | SMF database & log files |
Primary Sub directories under /usr directory:
| /usr/bin | Standard system commands |
| /usr/ccs | C-compilation programs & libraries |
| /usr/demo | Demonstration programs & data |
| /usr/dt | Directory or mount point for Java desktop system software |
| /usr/include | Header files (for C program) |
| /usr/jdk | Directory that contains java program & directories |
| /usr/kernel | Platform independent loadable kernel modules that are not required during boot process |
| /usr/sbin | System administrator commands |
| /usr/lib | Architecture dependent database, various program libraries & binaries that are not directly involed by the user |
| /usr/opt | Configuration information for optional packages |
| /usr/spool | Symbolic link to /var/spool |
Primary Sub directories under /var directory:
| /var/adm | log files |
| /var/crash | For storing crash files |
| /var/spool | Spooled files |
| /var/svc | SMF control files & logs |
| /var/tmp | Long-term storage temporary files across a system reboot |
Note: In-memory directories are created & maintained by Kernel & system services. A user should never create or alter these directories.
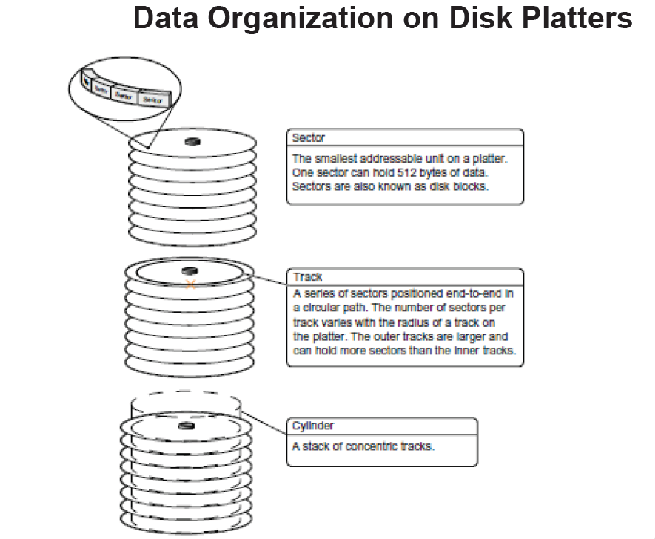
Physical Disk Structure

A disk device has physical and logical components.
Physical component: disk platters, read write head.
Logical component: disk slices, cylinders, tracks, sectors
Data Organization on the Disk Platters:
A disk platter is divided into sectors, tracks, cylinders.
| Disk Terms |
Description
|
| Track | A concentric ring on a disk that passes under a single stationary disk head as the disk rotates. |
| Cylinder | The set of tracks with the same nominal distance from the axis about which the disk rotates. |
| Sector | Section of each disk platter. |
| Block | A data storage area on a disk. |
| Disk controller | A chip and its associated circuitry that controls the disk drive. |
| Disk label | Part of the disk, usually starting from first sector, that contains disk geometry and partition information. |
| Device driver | A kernel module that controls a physical (hardware) or virtual device |
Disk slices are the group of cylinders that are commonly used to organize the data by function. A starting cylinder and ending cylinder defines each slice and determine the size of the slice.
To label a disk means writing the slice information on the disk. The disk is labeled after the changes has been made to the slice.
For SPARC Systems
SPARC based systems maintain one partition table on each disk.

The disk partition and slices in SPARC system:
| Slice | Name | Function |
| 0 | / | Root directory File System |
| 1 | Swap | Swap area |
| 2 | Entire Disk | |
| 3 | ||
| 4 | ||
| 5 | /opt | Optional Software |
| 6 | /usr | System executables & programs |
| 7 | /export/home | User files & directory |
For x86/x64 systems
The SMI label scheme maintains two partition tables on each disk.
The first sector contains a fixed fdisk partition table.
The second sector holds the partition tables that defines slices in the Solaris fdisk partition. This table is labeled as VTOC
It includes a partition table in which we can define upto 10 (0-9) disk partitions(slices).
Provision has been made for maximum of 16 disk partition can be defined
System boots from the fdisk partition table which has been designated as the active fdisk partition.
Only one fdisk partition on a disk can be used for Solaris.
X86/x64 Partitions & Slices
| Slice | Name | Function |
| 0 | / | Root directory File System |
| 1 | Swap | Swap area |
| 2 | Entire Disk | |
| 3 | ||
| 4 | ||
| 5 | /opt | Optional Software |
| 6 | /usr | System executables & programs |
| 7 | /export/home | User files & directory |
| 8 | boot | |
| 9 | Alternative disk |
Slices 8 and 9 are used for purpose specific to x84/x64 hadware
By default the slice 8 is the boot slice and contains :
GRUB stage1 program in sector0.
The Solaris disk partition VTOC in sectors 1 & 2.
The GRUB stage2 program beginning at sector 50
Slice 9 by the convention of IDE & SATA is tagged as alternate slice. It occupies 2nd & 3rd Cylinders(Cylinder 1 & 2) of Solaris fdisk partition.
Naming conventions for Disks:
The Solaris disk name contains following components :
Controller Number(cn): Identifies the HBA (Host Bus Adapter) which controls communication between system and disk unit.
Target Number(tn): It identifies a unique hardware address assigned to SCSI target controller of a disk, tape, or CD-ROM.
Fibre channel attached disks may use World Wide Name(WWN) instead of target number.
It is assigned in sequential manner as t0, t1, t2, t3.....
Disk Number(dn): It is also known as LUN (logical Unit Number). It varies from d0 if more than one disk is attached.
Slice Number(sn): It ranges 0-7 in SPARC systems and 0-9 in x86/x64 systems.
IDE & SATA disks do not use target controllers.
Ultra 10 systems uses a target (tn) to represent the identity of disks on primary and secondary IDE buses.
t0 Master Device on primary IDE Bus
t1 Slave Devie on primary IDE BUS
t2 Master Device on seconday IDE BUS
t3 Slave Device on seconday IDE BUS
In Solaris OS each devices are represented by three different names: Physical, logical and Instance name.
Logical Device Name:
It is symbolic link to the physical device name.
It is kept under /dev directory
Every disk devices has entry in /dev/dsk & /dev/rdsk
It contains controller number, target number(if req.), disk number and slice number
Physical Device Name:
It uniquely defines the physical location of the hardware devices on the system and are maintained in /devices directory.
It contains the hardware information represented as a series of node names(separated by slashes) that indicate path through the system's physical device tree to device.
Instance Names:
It is the abbreviated name assigned by kernel for each device on system. It is shortened name for physical device name :
sdn: SCSI Disk
cmdkn: Common Disk Driver is disk name for SATA Disks
dadn: Direct Access Device is the name for the first IDE Disk device
atan: Advanced Technology Attachment is the disk name for the first IDE Disk device
The instance names are recorded in file /etc/path_to_inst.
Few commands viewing/managing devices:
prtconf command:
It displays system configuration information, including total memory. It list all possible instances of a device. To list instance name of devices attached with the system:
prtconf | grep -v not
format utility:
It displays the physical and logical device names of all the disks.
prtdiag command:
It displays system configuration and diagnostic information.
Performing device reconfiguration:
If a new device is added to the system and in order to recognize that device reconfiguration need to be done. This can be done in two ways:
First way:
1. Create a /reconfigure file.
2. Shut down the system using init 5 command.
3. Install the peripheral device.
4. Power on & boot the system.
5. Use format and prtconf command to verify the peripheral device.
Second Way:
Go to OBP and give the command:
ok>boot -r
and reboot the system.
devfsadm:
It performs the device reconfiguration process & updates the /etc/path_to_inst file and the /dev & /devices directories. This command does not require system re-boot, hence its convenient to use.
To restrict the devfsadm to specific device use the following command:
#devfsadm -c device_class
Examples:
#devfsadm
#devfsadm -c disk
#devfsadm -c disk -c tape
To remove the symbolic link and device files for devices that are no longer attached to the system use following command:
#devfsadm -C
It is also said to run in Cleanup mode. Prompts devfsadm to invoke cleanup routines that are not normally invoked to remove dangling logical links. If -c is also used, devfsadm only cleans up for the listed devices' classes.
Disk Partition Tables
The format utility enables to modify two types of partition on disk:
1. fdisk partition tables
2. Solaris OS partition tables (SPARC VTOC and x86/x64 VTOC)
The fdisk partition tables defines up to four partition on disk, however only one Solaris OS fdisk partition can exist on a disk. Only x86/x4 systems use fdisk partition tables.
We can use fdisk menu in the format utility to view & modify fdisk partition tables.
Solaris OS Partition Tables or Slices:
The SPARC VTOC & x86/x64 VTOC defines the slices that the Solaris OS uses on a disk.
We can use the partition menu from the format utility to view & modify these partition tables.
The SPARC system read VTOC from the first sector of the disk (Sector 0).
The x86/x64 systems read the VTOC from the second sector(sector 1) of the Solaris fdisk partition.
Few Terminologies:
| Part | The slice number. We can only modify slice 0 through 7 only. |
| Cylinders | The starting & ending cylinders for the slice |
| Size | The slice size in MG, GB, b(blocks) or c(cylinders) |
| Blocks | The space assigned to the slice |
| Flag | It is no longer used in Solaris. 00 wm = write & mountable 01 wu = write & un-mountable 10 rm = read-only & mountable 11 ru = read-only & unmountable |
| tag | A value that indicates how the Slice is used. 0=unassigned 1=boot 2=root 3=swap 4=usr 5=backup 6=stand 8=home 9=alternates Veritas Volume Manager array tags: 14=public region 15=private region |
Defining a Slice on SPARC systems:
1. Run the format utility and select a disk: Type format and select a disk.
2. Display the partition menu: Type partition at the format prompt.
3. Print the partition table: Type print at the partition prompt to display the VTOC
4. Select a slice: Select a slice by entering the slice number.
5. Set tag & flag values:
When prompted for ID tag, type question mark(?) and press enter to lsit tha available choices. Enter the tag name and press return.
When prompted for perission flags, type a question mark(?) and press enter to llist the available choices.
wm = write & mountable
wu = write & un-mountable
rm = read-only & mountable
ru = read-only & unmountable
The default flag is wm, press return to accept it.
6. Set the partition size: Enter the starting cylinder and size of the partition.
7. label the disk: label the disk by typing label at partition prompt.
8 Enter q or quit to exit out partition or format utility.
Creating fdisk partition using format utility(Only for x86/64 systems):
1.run the format utility and select a disk: Type format and select a disk.
2. Enter the fdisk command at format menu: If there is no fdisk partition defined, the fdisk presents the option to create a single fdisk partition that uses the entire disk.
type n to edit the fdisk partition table.
3. To create a fdisk partition select option 1.
4.Enter the number that selects the type of partition. Select option 1 to create SOLARIS2 fdisk partition.
5.Enter the percentage of the disk which you want to use.
6.fdisk menu then prompts if this should be active fdisk partition. Only the fdisk partition that is being used to boot the system be marked as active fdisk partition. Because this is going to be non-bootable, enter no.
Defining a Slice on x86/64 systems:
1. run the format utility and select a disk: Type format and select a disk.
2. Display the partiition menu: Type partition at the format prompt.
3. Print the partition table: Type print at the partition prompt to display the VTOC
4. Select a slice: Select a slice by entering the slice number.
5. Set tag & flag values:
When prompted for ID tag, type question mark(?) and press enter to lsit tha available choices. Enter the tag name and press return.
When prompted for perission flags, type a question mark(?) and press enter to list the available choices.
wm = write & mountable
wu = write & un-mountable
rm = read-only & mountable
ru = read-only & unmountable
The default flag is wm, press return to accept it.
6. Set the partition size: Enter the starting cylinder and size of the partition.
7. label the disk: label the disk by typing label at partition prompt.
8 Enter q or quit to exit out partition or format utility.
Note: For removing a slice, the steps are same as creating the slice. The only difference is at the point where specify the size of partition as 0MB.
Viewing the disk VTOC:
There are two methods to view a SPARC or x86/x64 VTOC on a disk:
1. Use the verify command in the format utility:
#format
#format> verify
2. Run prtvtoc command from the command line
#prtvtoc /dev/rdsk/c0t0d0s3
The VTOC on SPARC systems is the first sector on the disk
The VTOC on X86/x64 systems is in the second sector of the Solaris fdisk parition on the disk.
Replacing VTOC on a disk:
1. Save the VTOC information to a file as follows:
# prtvtoc /dev/rdsk/cotodos2 > /var/tmp/cotodos2.vtoc
2. Restore the VTOC using fmthard command:
#fmthard -s /var/tmp/cotodos2.vtoc /dev/rdsk/cotodos2
If we want to replace the current VTOC with the previously saved VTOC :
1. Run the format utility, select a disk, label it with default partition table or define slices & label the disk
2. use fmthard command as follows:
#fmthard -s /dev/null /dev/rdsk/c0t0d0s1
Viewing & replacing fdisk Partition table(Only for x86/x64 systems):
To view fdisk partition table:
#fdisk -W - /dev/rdsk/c1d0p0
To save fdisk partition table information to a file:
#fdisk -W /var/tmp/c1dopo.fdisk /dev/rdsk/c1dop0
To replace the fdisk partition table :
#fdisk -F /var/tmp/c1dopo.fdisk /dev/rdsk/c1dop0
Raw Device:The device which is not formatted and not mounted is called Raw Device. It is same as the unformatted drive in windows. Its information is stored in /dev/rdsk/SliceName(c0t0d0s3)
Block Device: The device which is formatted and mounted is called Block Device.
Working with Raw device: In the previous section we saw how to create a slice or partition. In order to use that partition, it need to be formatted using newfs and mounted on a mount point. Going forward we are going to discuss these concepts .
1. Formatting the raw device using “newfs” command:
The newfs command should always be applied to raw device. It formats the file system and also creates new lost+found directory for storing the unsaved data information.
Lets consider we have a raw device c0t0d0s3, which we want to mount.
#newfs /dev/rdsk/c0t0d0s3
To verify the created file system following command is used:
# fsck /dev/rdsk/<deviceName>
Once the file system is created, mount the file system.
2. Mounting the device:
It is the process of attaching the file system to the directory under root. The main reason we are going for mounting is to make the file system available to the user for storing the data. If we don’t mount the file system it cannot be accessed. It is always used for block devices.
Lets consider we want to mount raw device /dev/rdsk/c0t0d0s3 on the file system /oracle. Following step shows how to mount:
#newfs /dev/rdsk/c0t0d0s3
#mkdir /oracle
#mount /dev/dsk/c0t0d0s3 /oracle
Note: This is temporary and the file system /oracle is un-mounted upon the end of the session. To make it permanent, we need to update information to /etc/vfstab.
The “vfstab” is also called Virtual File System Table:
The /etc/vfstab(Virtual File system table) lists all the file systems to be mounted during system boot time with exception of the /etc/mnttab & /var/run. The vfstable contains following seven fields:
1. device to mount: This is the block device that needs to be mounted. E.g: /dev/dsk/c0t0d0s3
2. device to fsck: This is the raw device that needs to be mounted. E.g: /dev/rdsk/c0t0d0s3
3. mount point: The file system on which the block device need to be mounted. E.g: /oracle
4. FS type: ufs by default
5. fsck pass:
1- for serial fsck scanning and
2- for parallel scanning of the device during boot process.
6. mount at boot: 'yes' to auto-mount the device on system boot
7. mount options: There are two mount options
'-' for large files: This is default option for solaris 7,8,9,10. The files will have by default 'rw' permission and they can be more the 2gb in size.
'ro' for no large files : This option was default option in SOLARIS versions earlier than 7. The default permission for the files created is 'ro'. The files cannot be more than 2gb in size.
The tab or white space is used as a separator The dash(-) character is used as place holder for the fields when text arguments are not appropriate.
Note: When we are trying to create, modify or delete a slice, the complete information about the slice is updated under /etc/format.dat.
Note: When we are trying to create, modify or delete a slice, the complete information about the slice is updated under /etc/format.dat.
/etc/mnttab:
It is an mntfs file system that provides read-only information directly from kernel about the mounted file system on local host. The mount command creates entry in this file. The fields in /etc/mnttab are as follows:
Device Name: This is the block device where the file system is mounted.
Mount Point: The mount point or directory name where the file system is attached.
File System Type: The type of file system e.g UFS.
Mount options(includes a dev=number): The list of mount option.
Time & date mounted: The time at which the file system was mounted.
Whenever a file is mounted an entry is created in this table and whenever a file is removed an entry is removed from the table. When the mount command is used without any argument, it lists all the mounted file system under /etc/mnttab.
Hiding a file system:
It is a process of mounting the file system without updating the information under /etc/mnttab. The Command to do so is :
#mount -m <Block Device> <Mount Point>
e.g.#mount -m /dev/dsk/c0t0d0s3 /oracle
If we do not update /etc/mnttab file, the df -h will not be able to show the file.
Un-mounting the file system:
It is a process of detaching the file system from the directory under root. If the file system is unmounted, we cannot access the data from it. The main reason to unmount the file system is for deleting a slice and troubleshooting activities.
Syntax:
unmount <File System Name>
unmount -f <File System Name> (forcibly unmounting the file system)
Steps for Unmounting a normal file system:1. #unmount <File System Name>
2. Remove entry for the file system from /etc/vfstab
Steps for Unmounting a busy file system:
1. Check all the open process Ids running in file system. To do so following is the command:
#fuser -cu <FileSystemName>
It displays all the open Process Ids running on the file system.
2. Kill all the open process. To do so the command is:
#fuser -ck <FileSystemName>
3. Unmount the file system:
#unmount <FileSystemName>
4. Remove entry for the file system from /etc/vfstab
How to mount the file system with 'no large file' option?
1. Use mount command with appropriate parameters:
#mount -o ro, nolargefiles <Block Device> <FileSystemName>
2. Edit /etc/vfstab with given parameters
<Block Device Name> | <RawDeviceName> | <FileSystemName> | <FileSystemType(UFS)> |<FSCK Pass>| <Mount at boot> | <Mount Option>
How to converting “no large files” to “large files”?
1. mount -o remount, rw, largefiles <Block Device> <File System Name>
2. vi /etc/vfstab. Change the mount option for the device from 'ro' to '-'
newfs(Explore more!!!):
When we are creating a file system using newfs command on a raw device, it creates lots of data structure such as logical block size, fragmentation size, minimum disk free space.
1. Logical Block Size:
- SOLARIS supports logical block size in between 4096b to 8192b.
- It is recommended to create UFS file system with more logical block size because more block size will store more data.
- Customizing the block size:
#newfs -b 8192 <raw device>
2. Fragmentation Size
- The main purpose of it is to increase the performance of the hard disk by organizing the data continuously and which helps in providing fast read/write requests.
- The default fragmentation size is 1kb.
- By default fragmentation is enabled in SOLARIS OS.
3. Minimum Disk Free Space
- It is the % of free space reserved for lost+found directory for storing the unsaved data information.
- The default minimum disk free space before SOLARIS 7 is 8%, whereas from SOLARIS 7 onwards it is auto defined between 6% to 10%.
- Customizing the minimum disk free space:
#newfs -m <Value B/W 6-10%> <raw Device>
Tuning File System:
It is process of increasing the minimum disk free space without loosing the existing data and disturbing the users (unmounting the file system). Following command is used to tune file system?
#tunefs -m 10 <raw device>
Managing File System Inconsistencies and Disk Space:
What is File Inconsistencies? What are the reason for File Inconsistencies?
The information about the files are stored in inodes and data are stored in blocks. To keep track of the inodes and available blocks UFS maintains set of tables. Inconsistency will arise if these tables are not properly synchronized with the data on disks. This situation is File Inconsistencies.
Following can be one of the possible reason for the File Inconsistencies:
1. Improper shutdown of the system or abrupt power down.
2. Defective disks.
3. A software error in the kernel.
How to fix disk Inconsistencies in Solaris 10?
In Solaris we have fsck utility to fix the disk or file system inconsistencies. We will discuss now in detail, how to use the fsck utility to manage the disks/file system.
File System Check(fsck) (Always runs on raw device):
The main purpose of fsck is to bring the file system inconsistency to consistent. FSCK should be applied to unmounted file system. There are two modes of it:
1. Interactive Mode: If we are running fsck in interactive mode we need to give yes option every time to continue to next step.
#fsck /dev/rdsk/c0t0d0s7
2. Non-Interactive Mode: If we are running fsck in non-interactive mode by default it takes yes option to continue to next step.
#fsck -y /dev/rdsk/c0t0d0s7
Other fsck command options:
fsck -m [Displays all file system along with states]
fsck -m <raw device> [States of specific device/file system]
State Flag: The Solaris fsck command uses a state flag, which is stored in the superblock, to record the condition of the file system. Following are the possible state values:
| State Flag | Value |
| FSACTIVE | The mounted file system is active and the data will be lost if system is interrupted |
| FSBAD | The File System contains inconsistent data |
| FSCLEAN | The File System is unmounted properly and don't need to be checked for in consistency. |
| FSLOG | Logging is enabled for the File System. |
| FSSTABLE | The file system do not have any inconsistency and therefore no need to runfsck command before mounting the file system. |
fsck is a multipass file system check program that performs successive passes over each file system, checking blocks and sizes, pathnames, connectivity, reference counts, and the map of free blocks (possibly rebuilding it). fsck also performs cleanup. fsck command fixes the file system in multiple passes as listed below :
Phase 1 : Checks blocks and sizes.
Phase 2 : Checks path names.
Phase 3 : Checks connectivity.
Phase 4 : Checks reference counts.
Phase 5 : Checks cylinder groups.
Note: The File System to be repaired must be inactive before it can be fixed. So it is always advisable to un-mount the file system before running the fsck command on that file system.
Identifying issues on file systems using fsck:
Type fsck -m /dev/rdsk/c0t0d0s7 and press Enter. The state flag in the superblock of the file system specified is checked to see whether the file system is clean or requires checking. If we omit the device argument, all the UFS file systems listed in /etc/vfstab with an fsck pass value of greater than 0 are checked.
In the following example, the first file system needs checking, but the second file system does not:
#fsck -m /dev/rdsk/c0t0d0s7
** /dev/rdsk/c0t0d0s7
ufs fsck: sanity check: /dev/rdsk/c0t0d0s7 needs checking
#fsck -m /dev/rdsk/c0t0d0s8
** /dev/rdsk/c0t0d0s8
ufs fsck: sanity check: /dev/rdsk/c0t0d0s8 okay
Recover Super block(when fsck fails to fix):
1. #newfs -N /dev/dsk/c0t0d0s7
2. fsck -F ufs -o b=32 /dev/rdsk/c0t0d0s7
The syntax for the fsck command is as follows:
#fsck [<options>] [<rawDevice>]
The <rawDevice> is the device interface in /dev/rdsk. If no <rawDevice> is specified,fsck checks the /etc/vfstab file. The file systems are checked which are represented by the entries in the /etc/vfstab with :
1. The value of the fsckdev field is a character-special device.
2. The value of the fsckpass field is a non-zero numeral.
The options for the fsck command are as follows:
-F <FSType>. Limit the check to the file systems specified by <FSType>.
-m. Check but do not repair—useful for checking whether the file system is suitable for mounting.
-n | -N. Assume a "no" response to all questions that will be asked during the fsck run.
-y | - Y. Assume a "yes" response to all questions that will be asked during the fsck run.
Steps to run fsck command :
1. Become superuser.
2. Unmount the file system that need to check for the file system inconsistency.
3. Use the fsck command by specifying the mount point directory or the/dev/dsk/<deviceName> as an argument to the command.
4. The inconsistency messages will be displayed.
5. fsck command will not necessarily fix all the error. You may have to run twice or thrice until you see following message:
"FILE SYSTEM STATE NOT SET TO OKAY or FILE SYSTEM MODIFIED"
6. Mount the repaired file system.
7. Move the files and directories of lost+found directories to their corresponding location. If you are unable to locate the files/directories in lost+found directories, remove the files/directories.
Repairing files if boot fails on a SPARC system:
1. Insert the Solaris DVD
2. Execute a single user boot from DVD
ok boot cdrom -s
3. use fsck command on faulty / (root) partition to check and repair any potential problems in the file system and make the device writable.
#fsck /dev/rdsk/c0t0d0s0
4. If the fsck command is success, mount the /(root) file system on the /a directory.
#mount /dev/dsk/c0t0d0s0 /a
5. Set and export the TERM variable, which enables vi editor to work properly.
#TERM=vt100
#export TERM
6. Edit /etc/vfstab file & correct any problems.
#vi /a/etc/vfstab
:wq!
7.Unmount the file system.
#cd /
#unmount /a
8. Reboot the system
#init 6
Solaris Disk Architecture Summary:
1. VTOC (Volume Table of Content) [0-sector]:
It contains information about the disk geometry and hard drive information. The default location is in '0' sector. The command to display VTOC is as follows:
#prtvtoc <Device/Slice Name>
2. Boot Sector [sector 1-15]:
It contain boot traps program information.
3. Super Block [sector 16-31]:
It contains following information:
1. Hardware manufacturer
2. Cylinders
3. Inodes
4. Data Block
4. Backup Super Block:
Super block maintains identical copy of its data in Backup Super Block. If Super Block is corrupted we can recover it using backup server super block number.
The command to display the backup super block number of a slice is:
newfs -N <SliceName>
5. Data Block:
It contains complete information about the data. Each block is divided into 8KBs. For every 8KB there are addresses called block address for kernel reference
6. Inode Block:
Inode block contains information about all inodes.
Note: Backup Super bock, data block, inode block are available in any part of the hard drive starting from 32 sectors of hard drive.
Swap Management:
The anonymous memory pages used by process are placed in swap area but unchanged file system pages are not placed in swap area. In the primary Solaris 10 OS, the default location for the primary swap is slice 1 of the boot disk, which, by default, starts at cylinder 0.
Swap files:
It is used to provide additional swap space. This is useful when re-slicing of disk is difficult. Swap files reside on files system and are created using mkfile command.
swapfs file system:
The swapfs file system consists of Swap Slice, Swap files & physical memory(RAM).
Paging:
The transfer of selected memory pages between RAM & swap areas is termed as paging. The default page size in Solaris 10 SPARC machine is 8192bytes and in X86 machine is 4096bytes.
Command to display size of a memory page in bytes:
# pagesize
Command to display all supported page sizes:
# pagesize -a
Swapping is the movement of all modified data memory pages associated with a process, between RAM and a disk. The available swap space must satisfy two criteria:
1. Swap space must be sufficient to supplement physical RAM to meet the needs of concurrently running processes.
2. Swap space must be sufficient to hold crash dump(in a single slice), unless dumpadm(1m) has been used to specify a dump device outside of swap space.
Configuring Swap space:
The swap are changes made at command line is not permanent and are lost after a reboot. To permanently add swap space, create an entry in the /etc/vfstab file. The entry in /etc/vfstab file is added to swap space at each reboot.
Displaying the current swap configuration:
#swap -s
The swap -s output does not take into account the preallocated swap space that has not yet been used by a process. It displays the output in Kbytes.
Displaying the details of the system's physical swap areas:
#swap -l
It reports the values in 512byte blocks.
Adding a swap space:
Method 1: Creating a swap slice.
1. #swap -a /dev/dsk/c1t1d0s1
2. Edit the /etc/vfstab file and add following entry to it:
/dev/dsk/c1t1d0s1 - - swap - no -
Note: When the system is rebooted the new swap slice is automatically included as the part of the swap space. If an entry is not made in the /etc/vfstab file the changes made in swap configuration is lost after the reboot.
Method2: Adding swap files.
1. Create a directory to hold the swap files:
#mkdir -p /usr/local/swap
2. Create swap file using mkfile command:
#mkfile 20m /usr/local/swap/swapfile
3. Add the swap file to the system's swap space:
#swap -a /usr/local/swap/swapfile
4. Add following entry for the swap file to the /etc/vfstab file:
/usr/local/swap/swapfile - - swap - no -
Removing a swap space:
Method1: Removing the swap slice
1. Remove the swap slice:
#swap -d /dev/dsk/c1t1d0s1
2. Delete the following entry from /etc/vfstab file:
/dev/dsk/c1t1d0s1 - - swap - no -
Method2: Removing swap files.
1. Delete the swap file from current configuration:
#swap -d /usr/local/swap/swapfile
2. Remove the swap file to free the disk space:
#rm /usr/local/swap/swapfile
3. Remove following entry for the swap file to the /etc/vfstab file:
/usr/local/swap/swapfile - - swap - no -
No comments:
Post a Comment